
Example brief: researching restaurants for a photography service
An illustrative research task, not a real customer result or a prediction of how many businesses the app will return.
- Category
- Restaurants: the prospective customers, rather than photography, the service being sold.
- Area
- One location within your travel area, with a radius you can review realistically.
- Review question
- Does the official website show an observable connection to the photography work you offer?
- Output
- A reviewed working list with a source, research date and reason for including each business.
Open the correct app and review your plan
Use the Android or iPhone store links on the LeadFinder app page. Check compatibility, current pricing, the billing period and included search or download allowances before purchasing. Open the app and complete the account steps shown in your version. This guide does not assume a free allowance or a particular subscription level.
Choose the businesses you want to research
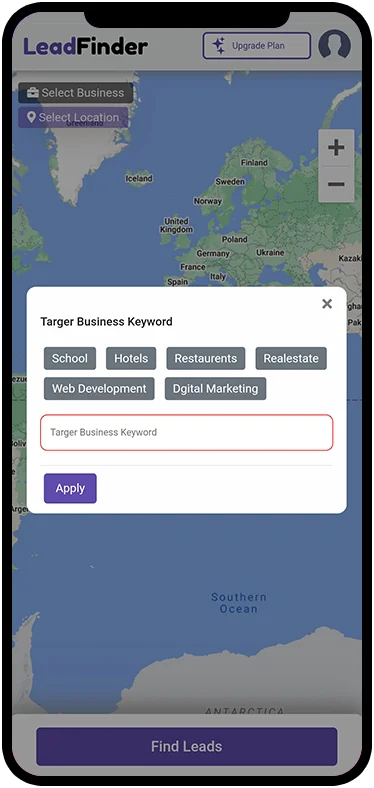
In the pictured version, Select Business opens a Target Business Keyword panel with suggestions and an Apply button. Choose the category of business you want to reach. A photographer looking for restaurant clients would start with restaurants, then inspect whether each result actually fits. A broad term is not a substitute for knowing your intended customer.
Set a location and a useful radius
Choose the location for your research and set a radius that fits the area you serve. Record the category, centre and radius in your own notes. Keep those choices fixed for the first search so you can assess the results before expanding. If you later compare neighbouring areas, label the exports separately to help identify overlapping records.
Run the search, then inspect the available fields
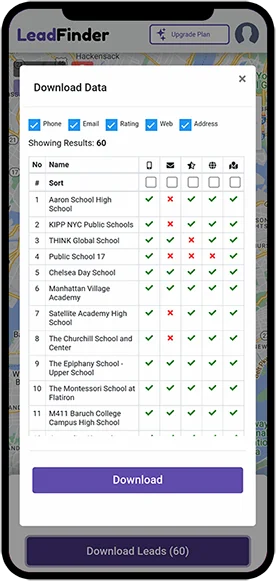
Start the search using the control shown in your app. Once results are available, check the business names and addresses and review the contact fields offered. In the pictured Download Data screen, indicators show whether phone, email, website and address details are available. The number in this screenshot belongs to that example screen; your search may return a different number. Missing email or website details do not by themselves mean a business is inactive.
Download and preserve an original copy
Review the fields and download options available to your plan. Save the CSV, keep an untouched copy, and use a separate working copy for your notes. Check that the columns line up when importing into a spreadsheet. Import phone numbers as text so formatting such as leading zeros is retained. Review a small portion of the file before using the complete list.
Decide which businesses belong on your shortlist
Open the official websites of promising businesses and record a specific reason each fits your offer. Separate observations from unknowns: a business category, contact detail or website gap does not establish budget or buying interest. Keep the source and review date with your notes, leave missing fields blank, and choose an appropriate next action for each record.
- Check the business identity and branch before combining records.
- Write one observable reason for retaining each prospect.
- Review the published contact route before planning any follow-up.
Continue your research
PUT IT INTO PRACTICE
Explore the LeadFinder app
